Friday, September 17, 2010

Vango Helium 200 - Equipment Review - Tent -

Equipment:
Vango Helium 200 2 man tent.


Intro:
The hybrid tunnel design, ease of pitching and watertight seams make the 2 man Helium 200 a welcome shelter at the end of a day on the hills. TBS® Pro and pre-bend poles offer exceptional stability, end vents allow for a through flow of air reducing condensation build up and its light weight and compact pack size make the Helium ideal for short trips without compromising comfort.
The main reasons for purchasing were for a very lightweight tent at a reasonable price.
At 1.3kg for $A329 on ebay this is about as good as you can get weightwise for the price.
I now have the flexibility of a spacious 1-2 man tent to go with the Exped Sirius 2-3 man tent.
                   
Features:
  • All in one pitching
  • TBS® Pro Tension Band System
  • Protex® 5,000HH SPU ripstop nylon 20D
  • NEW 40D breathable ripstop inner tent
  • HD nylon groundsheet
  • Force Ten FlexLite poles
  • Flat pole sleeves
  • NEW Dyneema guylines
  • Pre-angled poles
  • O shaped inner door
  • Flysheet door can be opened as a vent
  • Rain stop flysheet door
  • Multiple reflective points
  • NEW flysheet vents with mesh covering
  • Part mesh inner door
  • Lightweight stuffsac


Review:
Tested the Vango tent on the Freycinet Peninsular / Wineglass Bay / Bay of Fires hike.
Easy to carry, nice and small so easy to put virtually anywhere in the pack.
Need to practice some more on setting it up, couldnt get it as tight as I liked especially since it was likely to be wet overnight on the first night.
Overall was a little bit disappointed with it. I like a bit of space both inside and in the vestibule to protect your pack and other items that dont need to be inside. The Vango vestibule only just covered my 60L pack with boots and bottles.
I am 6ft tall and couldnt really sit up straight without my head touching the roof, there is no flat ceiling area inside, just a peak at chest level laying down and the roof slopes its way down at about a 60 degree angle to the feet where its about a foot tall in the middle apex.


Theres not much height to stick items at the feet end without them getting wet from any condensation off the ceiling overnight.

 I had condensation in the morning both in damp and dry conditions even though there seems to be plenty of ventilation. The sacrifice for extra few 100 grams of weight for the lack of that extra space probably isnt worth it.

Monday, September 13, 2010

Two Bays - Mornington Peninsular - VIC

Walk:  Two Bays Dromana to Cape Schank

Distance/Type: Hike 21km / One Way
Terrain/Rating:  Hilly and undulating countryside
Start Time:  11am
Start / Finish Location:  Arthurs Seat / Bushrangers Bay

Trip Detail Summary: 
This was just a surveillance walk/drive to get info on the track and any good overnight campsites along the way.  Start at Arthurs Seat Carpark, walk along various tracks and finish at Bushrangers Bay.

Trip Details:

Firstly had a look at the Arthurs Seat chairlift at the bottom of the hill. This chairlift has been shutdown for over a decade now after a few accidents due to lack of maintenance.  The chairlift VicParks are looking for a new operator to rebuild the .
Arthurs Seat chairlift.
The official start of the Two Bays walk is actually from Dromana beach and then head up Latrobe Parade to the corner of Latrobe Parade and Bunurong Track.  There's a small dirt carpark here which could take about 6 cars snuggly. 

Two Bays track start at Bunurong Track.
Walk across Bunurong Track, through the gate the path winds uphill for about 1.5km until you reach the Seawinds Gardens.  These gardens are accessible by car and a nice rest spot for this walk with picnic tables, water and toilets.

Seawind Gardens.
Continuing through Seawind Gardens the track heads slightly downhill with nice sweeping views of the bay.
At 3.5km into the walk we arrive at the junction with the Kings Falls circuit walk.  Not that you should need water yet, but there is a dam at this junction behind the mound on the East.
Seamist Drive dam.
The Kings Falls circuit walk takes a leisurely hour to do but would only recommend for a short day trip rather than as a side trip here. At the time of walking it was closed off due to storm damage with a few fallen trees across the track and damaging some of the boardwalks along the way. None of these made the track dangerous or unpassable but care is needed.

Kookaburra on the Kings Falls track.
The Kings Falls themselves had minimal water flowing and would only be of interest after some decent rainfall.
Kings Falls lookout.

Kings Falls.
Once the circuit is finished turn left back at the junction and head down Concept Spur track. Travelling down the track you get great views of McLaren Dam and the Rosebud Golf Course.
After 2km you pass the Bowls Club and McLaren Dam before reaching Waterall Gully Road.

Track at Waterfall Gully Road.
This next section is the "suburbia" part of the walk passing many houses. Turn right down Waterfall Gully Rd, turn left at Goolgowie St and head thru the reserve on the corner of Avalon Drive.
  
Goolgowie Reserve.
At the other end of the reserve you turn right and head down Yambil Ave. Turn left at the roundabout opposite the Peninsular Sands Estate and head down Duells Rd. At the T intersection turn right on Gardens Road and over the stile away from civilisation. The track is well signposted thru the streets.
Unfortunately the battery on my camera went flat from here on.

Yambil and Duells Rd roundabout intersection.
After about 1km of walking along the road reserve between farm land you cross over Browns Road and head on for another 1km before reaching the Greens Bush section of the walk.
Map:
http://www.visitmorningtonpeninsula.org/pdf/05_0289.pdf
 
I haven't check the track between Browns Rd and Boneo Rd but having a look around the Highfield/Long Point area you could camp near the Highfield buildings, Long Point next to Lightwood Creek or the unofficial/official halfway campsite, Lightwood Creek. The creek itself had a reasonable flow of clear water but as you are surrounded by farmlands if you had to drink it, I'd boil/treat it.  The Highfield buildings have toilet blocks but they may not be open. This looks like some sort of school camp setup so for most of the year it will be locked up and empty. You should be able to find yourself a water tap there. 

If you cut the walk slightly short, you could probably do this hike in a day with a daypack and a car shuffle to the Boneo Rd/Highfield car park.

If doing the full walk, the track continues across Boneo Rd and uses the track to Bushrangers Bay which takes about 30 mins. It then heads for 30 mins along the coast to the Cape Schanck Lighthouse.   There are toilets, water and a small kiosk here.

Badger Creek Weir - Healsville - VIC

Walk: Badger Creek Weir.

Distance/Type: 4km / Return  
Terrain/Rating:  Flat / Easy / No wheelchair access to weir.
Start Time:  11am
Start Location:  Badger Creek Picnic area.
Trip Detail Summary: 
Please note that in 2016 this area was completely devastated by a storm. All amenities were destroyed and as of 2018 trees were still down and virtually nothing has been done to clean it up.

Walk from Badger Creek Picnic area, crossing bridge and head up Lyrebird track along the creek before crossing back over the creek, heading up Coranderrk Track to the weir.  Head back to Picnic area completely along the main Coranderrk Track.
Trip Details:
Came across this little gem of a picnic ground and short walk park by accident.
Originally heading towards Marysville via the Maroondah Hwy I had to divert to Warburton due to the highway being closed just north of the Maroondah Reservoir.
Badger Creek is a little town about a 5 minute drive south east from Healseville along Don Rd.
The main attraction is the Weir which is reached by turning left up the Badger Creek Weir Rd.

Badger Creek Weir entrance
There are plenty of undercover seats and tables and bbqs scattered around the park and a reasonable toilet block.

Badger Creek Picnic area.

Having no real idea of the walks in the area I headed to the weir via what looked like the longer more scenic track to the left along the creek called Lyrebird Track.


Track across creek to Lyrebird Track.
With a huge amount of rainfall in the surrounding hillsides recently there was a huge flow of water in the creek.  I assume normally it would've been just a trickle with previous drought conditions.


Just after crossing the creek theres an intersection where Lyrebird Track heads off to the right. 

Lyrebird Track slightly flooded.
The track then follows the creek for about 10 minutes before crossing back over the creek and joining up with the main path called Coranderrk Trk.

Coranderrk Track.
After travelling a few more minutes down the Coranderrk Track theres a track on the left which leads down to the weir.

Badger Creek Weir bridge.

All in all a nice easy 40 min hike that you could take the family on.


Badger Creek Weir

Monday, September 6, 2010

Steavenson Falls - Marysville - VIC (Post Bushfire)

Walk:  VIC - Marysville - Steavenson Falls walk (Post Bushfire)

Distance/Type: 2.4km / Return

Terrain/Rating:  Short stroll along foot path / Low.

Start / Finish Time:  11am- 11:30am

Start / Finish Location:  Steavenson Falls Carpark.

Trip Summary:
The beautiful hamlet town of Marysville in the central highlands of Victoria was one of many towns devastated by the widespread bushfires on Saturday the 7th of February 2009, known as Black Saturday.
Having driven past the town a few times to go to various other bushwalks, today I decided to check out Marysville and how the main natural attraction, Steavenson Falls, is coming along. The day prior we had some record rainfalls so this would be as good a time as ever to see the falls at their capacity and take some pictures.
The devastation of the forests in the area is obvious well before entering the town with most trees affected, either being dead or showing signs of regrowth. The undergrowth is amazingly green with tree ferns and saplings in abundance due mainly to surprisingly good rainfall over the last 2 years. The state has been very lucky that the rainfall has arrived as we had been stuck in drought conditions for over a decade which led to the tinder dry bushfire prone conditions in the first place.
Having walked the area pre-bushfire I was amazed at how the views are so much more extended due to the lack of tree and bush foilage. Previously you wouldn't have been able to see much further than 100 metres in any direction, you would not see much of the river or the waterfall from the track until you were within 50m of them, but now the views were open all over the river valley and hillside.

Trip Details:
June 2010:
The falls are reached by driving along Falls Rd which runs east from the main street in Marysville. After driving about 1km you reach a gate with signs telling people not to enter.   Currently the last 2kms are under construction with works machinery onsite.
Falls Rd to Steavenson Falls
The road has nearly been completed to the carpark area with bitumen down and street lighting to be completed.

Open views of Steavenson River.
The walking track runs off the end of the road and looks like it is still a few months away from completion. There are trenches with electricity cabling and water pipes still uncovered. The plan for the walking track looks to be to have lighting all the way to the falls. Amazingly, with all the surrounding devastation, the original spotlight that was used to light the falls at night still stands and one assumes will be reconnected.


Lower track to the bottom of falls. The original spotlight still standing.
A new viewing platform with seats has been constructed on the original falls dam wall.
The new platform appears to be a major improvement on what was here originally.


New viewing platform.
There used to be a side track that you could take up to the top of the falls where there was a viewing platform as well. The start of the stairs to this side track is still there but had tape closing it off shortly further up.  In my brief short walk along it, it is well covered with undergrowth and with the huge trunks of trees and rubble lining the hill above Hard to know if this track will be re-opened. If so it will take quite a long time before its cleared enough to walk again.

Update 1: This walk was officially re-opened 2 weeks later on the 18th Sep 2010, with the road opened to the carpark, walking tracks sealed and a new toilet block constructed.

Update 2: Dec 2012. The track to the top of the falls and Bennisons Lookout are open.

Previous Marysville walk prior to the bushfires  here.

Tuesday, August 24, 2010

Lake Mountain - Marysville - VIC

Walk:  Lake Mountain cross country ski.

Distance/Type: No set track.  
Terrain/Rating:  Flat / Slight slopes.
Start Time:  10am
Start Location:  Lake Mountain Upper carpark.
Trip Detail Summary: 
 2hr drive north east from Melbourne out to the ski fields at Lake Mountain.
There is 20odd km of cross country tracks here. We had been to this area previously last year pre bushfires so we were interested to see how badly the bush was effected.  First time on skis so a lesson first then see how many bruises I could collect. 

Trip Details:
Arrived at Lake Mountain at 9:30am after a brief breakfast stop at the Marysville Bakery.
Collected out ski gear and luckily got a lesson booked in at 10am.

Lake Mountain
Our instructor went through the basics of how to put the skis on, how to steer, how to fall and most importantly how to stop. After a few practice runs near the snow making area we were taken up the main track and after 1 hour we were let loose.
Echo Flat trail.

The group started on the Taggerty Return trail then the Echo Point trail before having lunch at Echo Point.
Lake Mountain Tracks

Sunday, August 15, 2010

Barwon River - Geelong - VIC

Walk:  Barwon River

Distance/Type: 20km / Return  
Terrain/Rating:  Flat / Easy
Start Time:  11am/3pm
Start Location:  Fyansford Information Centre on Hamilton Hwy.
Trip Detail Summary: 
Walk along the northern bank of Barwon River to the Breakwater Rd / Rail Bridge, crossover, lunch then return back along the southern bank.
Trip Details:
This walk was done with the hiking group I'm a part of.
The "Information Centre" could be easily missed as its nothing more than shelter with no signage or maps or information to be seen from the carpark. We drove past as we werent sure but also to have a look along the path that we were going to walk as we knew that rain during the week had meant the Barwon River was flowing and a lot higher than normal.
We all met at the dirt carpark next to the Fyansford Hotel under windy and overcast conditions.
Even with the later start than normal there were more than usual late starts so the walk started 30 minutes late.We had 4 new members on this walk.
We headed east along the trail on the northern bank of the river and within 500m had to divert up a grass bank due to flooding over the path. There were many benches along the way but most were surrounded by water.  Sound people were putting a kayak in at the disused pipe bridge.
After 1 hour we had walked approx 5km, pretty much as you would expect with the easy terrain.
There was a cafe about 90 minutes into the walk but we had our own drinks and food and planned to walk halfway and have lunch near the bridge train bridge in Geelong.
Toilets were located at Moorabool St Bridge and were well received.
We continued onto past the athletics track but were forced to turn around approx 100m from our half way point as a feeder creek/drain was overflooded and could not be passed around.
A couple of policemen on trailbikes passed us here as we headed back. I assume they may have been looking for the reason an alarm was going off at a riverside factory.
We choose to have lunch at a picnic ground between the athletics ground and rowing clubhouses.
A few decided to get out of the strong breeze and lunched by the clubhouses.
Having lunch we watched a dog swim across the river as well as the local fire brigade testing out there long ladder hose by feeding it from the river.
After 15 minutes for lunch we headed back crossing the river at the Moorabool St bridge.
Plenty of walkers and bike riders along the path today.
One of our new members had problems with her hip on the return leg so I took her bag and took the back with Anne to nurse her back to the starting point.
All in all it was an easy hike but was tough on the feet for some due to walking mainly on bitumen.
Total time was 5hrs incl lunchbreak.
The distance we ended up doing was 18km but really it could have be done in 4:30 hrs or less.
Drinks were had at the Fyansford Hotel afterwards and then we had dinner at the Mexican Graffiti restaraunt in Geelong.
Unfortunately this was one of the few times I didnt take photos having left my memory card in the laptop. grrr

Friday, July 2, 2010

Exped Sirius II Extreme - Equipment Review - Tent

Equipment:
Tent - Exped Sirius II Extreme


Intro:
The Exped Sirius II Extreme in the Terracotta Colour.
I bought this tent much cheaper online (-$150) from the New Zealand store http://www.bivouac.co.nz/ than I could find anywhere in Australia.
I enjoy having space when I go hiking and I wanted a tent that was flexible in any conditions thrown at me. 

There were 3 main factors in my purchase
  • Price to weight ratio had to be reasonable. It had to be lightweight for its size but not overly priced.
  • It had to be very good in all weather conditions (so a 4 season tent)
  • It had to be able to fit 3 adults incase of emergency. (on one hiking expedition this was used to fit a 3rd person in)
Review:
Plenty of room for 2 people with room to spare to store your essentials inside. I'm 6ft and it has good head height for sitting up in.


The door has a flyscreen and fly, both can be zipped up independently allowing for as much or little airflow as desired. Its very stable under blustery and rainy conditions.


The vestibule can be zipped up. You can buy a footprint for this as theres probably a bit too much air space between the walls and grass, so its protected but not as much as I'd like.
The tent can be setup pretty quickly.
It has a few cute things like a rope along ceiling to hang a lamp from, pocket in the walls to store valuables off the floor,  illuminations on guy ropes so you can see them at night as well as pockets to wrap the guy ropes into.  I still tend to take this on solo hikes rather than the smaller tents I have.


Specifications:
Capacity: 2-3 adults

Weight: Minimum*: 5.8 # / 2.65 kg;
LightPackers: 4.6 # / 2.1 kg; fly, poles and footprint(sold separately)
UltraLight Packers:3.5 # / 1.6 kg; fly, poles
Packaged: 6.6 # / 3.1 kg

Area: Floor: 31.5 ft2 / 2.925 m2
Vestibule: 15 ft2 / 1.43 m2

Materials:
Rainfly: silicone coated ripstop nylon; untaped seams
Canopy: UV-resistant, flame retardant ripstop polyester
Floor: PU-coated, taffeta nylon
Poles: DAC Featherlite NSL 9mm TH72M aircraft grade aluminium

Packed size: 16x6’’ / 42x15 cm

Setup time: 10 minutes

Colors: Green and Terracotta

Saturday, January 2, 2010

Main Ridge Circuit - Guthega -Mt Townsend - Mt Kosciuszko - NSW


Walk:  Main Ridge / Mt. Kosciuszko / Mt Townsend Circuit from Guthega


Distance/Rated Duration/Type:  Hike 45km / 3 Days / Figure 8 Loop
Detailed information:  Wild Walks - Main Ridge circuit

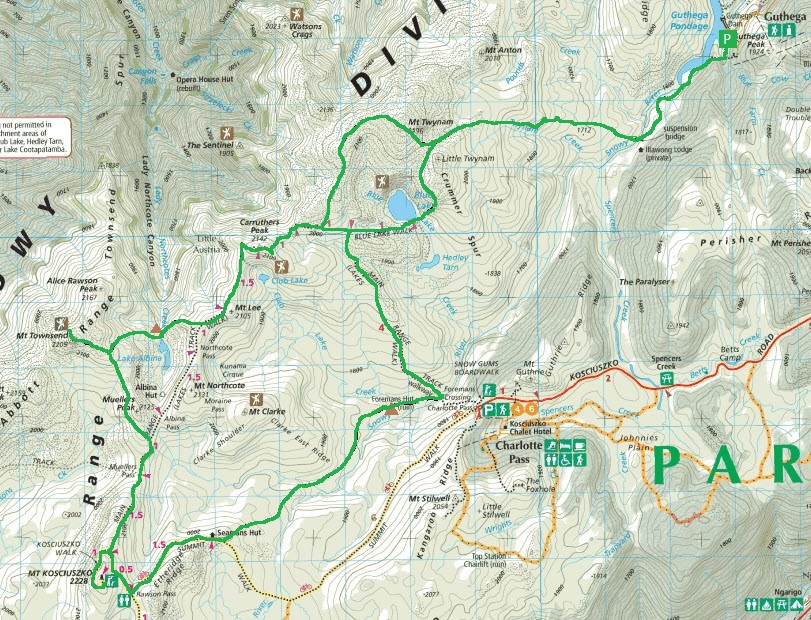
Map:


Terrain/Rating:  Mountainous terrain in varying conditions / Hard

Start / Finish Time:  
Day 1: 9:00AM  / 5:30PM
Day 2  9:00AM / 3:00PM
Day 3  9:00AM  / 3:00PM

Start / Finish Location:  
Guthega / Guthega

Trip Summary: 
One of my favourite walks in Australia.  
Combining on & off track hiking this walk transverses the pristine and iconic Snowy River near its headwaters.
You will walk by snow scattered mountains, have great high views above the aqua coloured Blue Lake, climb the two highest mountain peaks in Australia, with spectacular alpine views each day.
With the weather capable of changing within minutes, this hike has it all.  

From Guthega Alpine Inn head along the Snowy River before crossing over and walking offtrack up into the mountains. 
Walk down into the valley near Blue Lake before working your way up to Main Ridge crossing over Twynam track, then camp down near Albina Lake.
 
Head up to the 2nd highest mountain in Australia (Townsend) then work along track to Mt Kosciuszko. From there head past Seamans Hut, offtrack into the valley to camp near Foremans Hut ruins next to the Snowy River. 

The next day cross over creek, then up Main Ridge track across Blue Lake track up to Mt. Twynam. From Mt Twynam head off track thru woods past Blue Lake down to Snowy River again before making it back to Guthega.

Detailed Topo Maps, Compass/GPS and PLB are essential.
Details on the Wild Walks website which recommends a 4 day hike.  We did this hike in 3 days with a very long first day.

How to get there:
From Jindabyne take the Kosciuszko Road north. Turn right into Guthega Road and drive to the end.
Park near the Guthega Alpine Inn / Guthega Pondage.  

Accomodation:
For a good base camp 20 minutes from the start, stay at Island Bend campground along Guthega Road.  It is free and has a pit toilet.
Island Bend campground

If you want a hot shower & toilet then the closest campgrounds are at Lake Jindabyne. 

Trip Detail:
Head down the concrete road from the main Guthega Road.
Guthega start of trek


Continue onto the dirt track (with small boulders at entrance). 
Head along the track and down the valley, with Snowy River on your right until you reach Blue Cow Creek.

Heading down to Blue Cow creek


Either walk across the rocks on the creek or use the Flying Fox if the water level is high.

Blue Cow creek


Continue walking along the bush track parallel to the Snowy River.
After about 50 mins you will arrive at Illawong Lodge, which is an emergency shelter.

Arriving at Illawong Lodge

Head down to the suspension bridge and cross the Snowy River.

View from other side of Snowy River

From here the track becomes faint and you will need to rely on Topo Maps and Compass/GPS.

Heading up to Pounds Creek Flats

Working your way up the hill through Pounds Creek Flats, depending on the time of year, but most likely there will be snow and plenty of small creeks to work your way through.
This is the original Day 1 Camping Area for the hike but we found at having done only 7km and around 2 hours of walking we pressed ahead.

Head upwards through the creek valley, past the Mt Twynam snow areas which appears on your right.

Pounds Creek Flats with Mt Tynam in the distance.

Further up you need to head to the left which will guide towards large boulders.  

Heading up over ridge to Blue Lake

Working over the boulders  the view opens up to Blue Lake which should be on your right. 

Blue Lake

Be very careful here as there are high dropoffs.
From up high here you should have a good view of  Blue Lake.
You need to head down to its bank where the outflow point feeds Hedley Tarn.  There should be the start of the Blue Lake Track.

The Blue Lake track starts down at the bank where Blue Lake feeds out.


Work your way up Blue Lake Track and after 1km you reach the intersection with Main Ridge Track.


On Blue Lake track. Head right up Main Ridge track.

Head right towards Carruthers Peak / Mt Townsend.


Main Ridge track towards Carruthers Peak.

This is one of the riskiest parts of the walk with snow possibly covering the track.
Bypass the side track on the right near Carruthers Peak, this will be used to return back to Guthega on the last day.

Looking back along Main Ridge track.

After about a hour you should notice Albina Lake down the righthand side of the track.

Albina Lake view from Main Ridge track.

Look at setting up camp a reasonable distance from the lake & nearby Lady Northcote Creek.
From here you can look at doing the side-trip to Mt Townsend in the morning.

DAY2:
You can either leave your packs at camp, visit the peak and retrace your steps back out to Main Ridge track or take your packs some way up the hill and drop in the open to visit the peak. You could then take the southern side around Albina Lake to head back onto Main Ridge Track further east.

Heading up to Mt Townsend.

Nearing the last 100m to Mt Townsend make your way through the boulders until you reach the cairn.
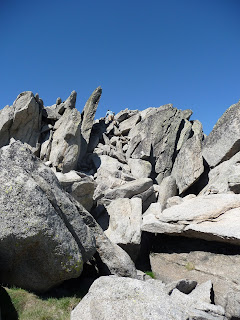
Nearly at Mt Townsend peak

Once you have come down your Mt Townsend sidetrip head back to the Main Ridge track.

View of Main Ridge track across Albina Lake, from Mt. Townsend.

 Theres easy walking along the southern side of Albina Lake, following the contours you'll see Main Ridge track heading east upwards towards Mt Kozi.

Main Ridge track heading towards Mt Kozi.

This will be probably you busiest part of the trip.  Drop your packs at the Mt Kozi side track entrance.  

Mt Kozi path.

It only takes a few mins to get to the peak. 

Mt Kozi peak.

You have now been at the 2 highest peaks in Australia.
From here you can see Rawson Pass towards the east which is the next destination.

View of Rawson Pass from Mt. Kozi.

Continue east along Main Ridge track to Rawson Pass.  The public toilets here are the last ones you'll see until you finish the trek.

Rawson Pass junction

Either here or a 20min walk along Summit Trail to Seaman's Hut are the best places for lunch as this walk goes off track after the hut.

Rawson Pass junction.

After 20 mins along the gravel track you'll reach Seaman's Hut.

Approaching Seaman's Hut

From here we head off track behind the hut and down the valley towards Foreman's Hut.

Heading down into Foreman's Hut valley

Heading down the valley you'll be walking through foot high scrub towards the northern bank of the Snowy River. There will be at least one creek crossing but they are easily crossed using boulders in the area.
Skirting along the Snowy River

Once over the creek, skirt near along the northern bank of the Snowy River.
You're probably looking at about 2 hours of this before the remnants of Foremans Hut comes into view further down the valley as it levels out.

Foreman's hut in the distance.

This will be your 2nd nights camping area with the Snowy River as your water supply nearby.
Note: You are only about 1km from Charlottes Pass across Snowy River incase of emergency.


Foreman's Hut camp arera

The final day starts with short walk back onto Main Range Track near Foremans Crossing.
Head away from the Snowy River uphill until you reach the Main Ridge track.

Main Ridge track heading back up towards Blue Lake intersection.

Head left uphill NW away from Snowy River for an hour before we reach the Blue Track/Main Ridge paved intersection we visited on the first day.


Heading towards Blue Lake intersection.

At the intersection TURN LEFT and head up towards Carruthers Peak again.
After about 1km at the Main/Ridge Mt Twynam intersection, turn right and head around NW of  Blue Lake towards Mt Twynam.


Track to Mt Twynam

You could have lunch on the Mt Twynam peak or somewhere further down along the creek valley.
There is very little shelter from the sun in this area. 
Head off from Mt. Twynam in an easterly direction towards the Pounds Creeks Flat area.


View of Blue Lake from Mt Twynam area

Backtrack you way back down the mountain using the Snowy River & Illawong Hut as your guide to the suspension bridge.

Marker tree for suspension bridge crossing.

Work you way back past Illawong Hut, Blue Cow Creek and back up to the carpark.


Snowy River

Jindabyne is your best place to get resupplied and freshened up after your trip.