Distance/Type: 3 Day 2 Night Hike 8.8km / 11.3km / 12km / One Way
Terrain/Rating: Undulating terrain on varying surfaces. Medium.
Start / Finish Time: 9am-12:15pm/7:40am-12:05pm/7:00am-11:30pm
3:15hrs / 4:30hrs / 4:30hrs
Start / Finish Location: Routeburn Shelter near Glenorchy/ The Divide on Milford Rd .
Trip Summary:
One of the great walks of New Zealand and one of the best to do in the world.
A well spaced out hike with spectacular views over all 3 days with brilliant accomodation locations.
The Tracknet company can arrange dropoff from Queenstown to the Routeburn Shelter and then pick you up 3 days later at The Divide to transfer you back to Te Anau (or Queenstown)
Trip Map:
Day 1:

Day 2:

Day 3:

Trip Details:
Day1:
We start this trip with a 8am bus trip from Queenstown via Tracknet
The trip takes about 60m mins along the picturesque Lake Wakatipu with a short stopover at Glenorchy general store to sign in the intentions book and get last minute supplies before you end up at the Routeburn Shelter around 9am. There are some spectacular photo opportunities of the lake along the way.
 |
| Routeburn Shelter |
Plenty of information and maps here to look at while you prep for the trip.

Directly across the dirt road is the start of the Routeburn Track and glimpse of the first foot bridge.
Routeburn Falls Hut is the first nights stopover and is a generally easy 3 to 4 hr walk to start with.
Less than 100 metres into the hike you'll get a view of the crystal clear blue waters of the Route Burn River so you know your senses are in for a treat along this track. The path is crushed rock at this point as it winds itself alongside the river and heads slowly upwards into the forest.

Directly across the dirt road is the start of the Routeburn Track and glimpse of the first foot bridge.
Routeburn Falls Hut is the first nights stopover and is a generally easy 3 to 4 hr walk to start with.
 |
| Routeburn River. |
 |
| Track start. |
There are a couple of side tracks in the first section of track including a "Nature Walk" and the Sugarloaf track.
The Sugarloaf track leads to 2 day alternative round trip heading up to Theatre Flat, Rockburn Hut and Lake Sylvan before joining back at the Sylvan campground, which is about a 5 minutes along the road prior to the shelter. The is a DOC fee-paying campground and has a toilet and water.
We continue straight on and after 15 mins into the hike we reach the first swing bridge at Sugarloaf stream.
 |
| Sugarloaf stream swingbridge. |
The track works away from the river for 20 minutes or so, where crossing another stream you will view Bridal Veil falls.
The track joins back to the river bank soon after the falls. There is a toilet here just before reaching Forge Flat.
The track joins back to the river bank soon after the falls. There is a toilet here just before reaching Forge Flat.
Forge Flat is the first chance to walk down to be at water level with the river. This is a rocky open flat area where you can sit on one of the boulders or logs for a nice snack break.
 |
| Forge Flat. |
Heading another 30 mins along the track we cross back over the Route Burn River where we see more fantastic views of the water colour.
 |
| Routeburn River. |
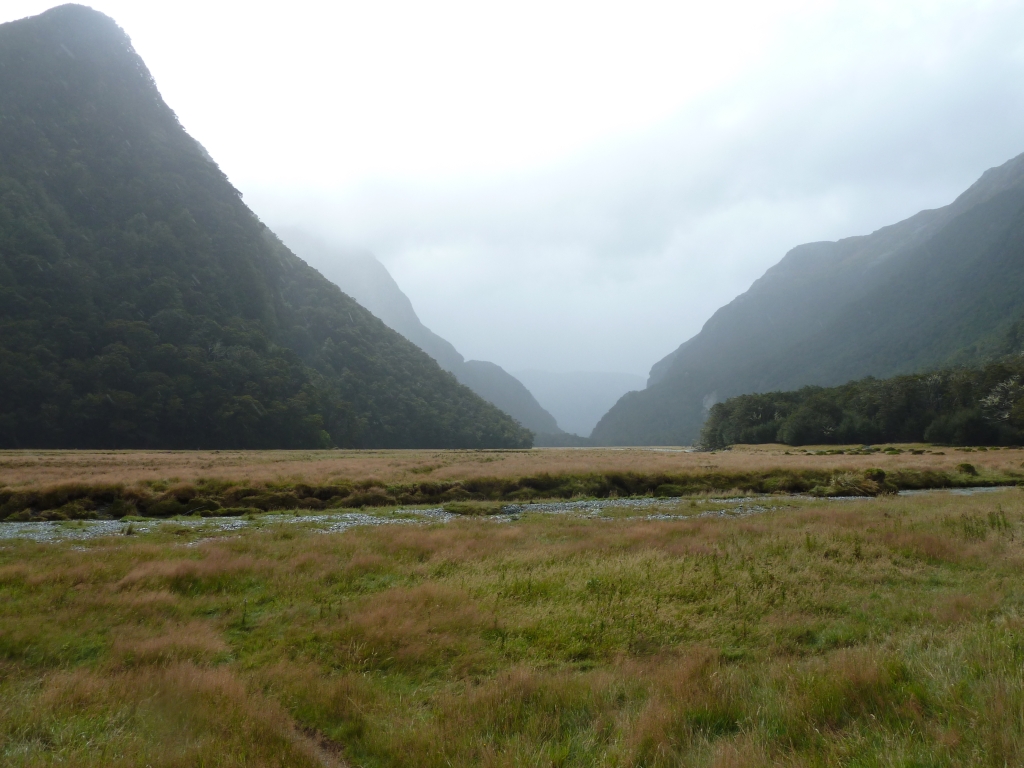
Approximately 90 mins into the trip you break out of the forest and reach the Routeburn Flats area which is a wide grasslands valley where the Route Burn river branches off in 2 directions.
Route Burn North which runs up through the valley and Route Burn left which continues along the track receiving its water from Routeburn Falls.
Route Burn North which runs up through the valley and Route Burn left which continues along the track receiving its water from Routeburn Falls.
 |
| Routeburn Flats. |
You can leave your packs at the intersection here and walk to the Routeburn Flat Hut, which is a slight side trip off the main track of about 10 mins.
You can also leave your packs here and walk the Routeburn North Branch Track which takes a few hours. This was the only time we had wet weather on this hike, so we bypassed this side trip.
The Routeburn Flat Hut is a good lunch stop before continuing on to Routeburn Falls Hut which is another 90 mins away.
The hut has all the same luxuries as the others, running water, sinks, gas stoves and flush toilets, but has only 20 bunks with mattresses rather than the typical 40 in the main huts on this track.
There is also a camping area here for those not using the huts.
 |
| Routeburn Flats Hut. |
Heading back to the intersection and onto the main track you work back up into forested areas which snakes its way along the base of the mountain range. There are many short swing bridges that cross over various streams along the way. The track is pretty rocky along here and there is evidence of rock falls in some areas.
 |
| Sunrise view of Flats from Falls Hut. |
As you work your way higher you start to get glimpses of the valley and before you know it you are at the Routeburn Falls Hut. This is very well appointed with plenty of room in the kitchen and dining areas. Facilities include gas stoves, running water and a wood fire.
There are 2 dorms of 20 bunk beds each in a corridor style. Don't forget to pack the earplugs.
There are 2 dorms of 20 bunk beds each in a corridor style. Don't forget to pack the earplugs.
 |
| Routeburn Falls Hut. |
Just behind the hut is the Routeburn Falls Lodge for the guided hikers. Very fancy but it doesn't have the A1 position of the general public hut. There are stunning views of the valley from the outside deck. As with all of these hikes its worth putting in the effort to wake up early and take in the gorgeous sunrises you can view. Only a minute further up the track past the Lodge are the Routeburn Falls which you will hear before you can see.
 |
| Routeburn Falls. |
Day 2:
The next morning you work your way up past the falls and walk along the Route Burn Left Branch. The narrow track winds its way along the left side of the raised Route Burn valley.
If there is any snow on the track, day 2 will be most likely when you will encounter it as this is the highest elevation area of the whole track.
If there is any snow on the track, day 2 will be most likely when you will encounter it as this is the highest elevation area of the whole track.
 |
| Route Burn Left Branch. |
 |
| View from Lake Harris back down the Route Burn Left Branch. |
About an hour into the 2nd day you get to Lake Harris. This is one of the most stunning views of the trip especially as the track runs high above and pretty much alongside the full length of the lake.
 |
| Lake Harris. |
Continuing past Lake Harris you reach Harris Saddle with its emergency shelter.

Day 3:
Heading off the next morning you pass the Lake MacKenzie lodge (for the guided travellers) and gain some height above the Hollyford Valley passing thru "The Orchard", which looks like a fruit tree orchard, before reaching Earland Falls. There's a pit toilet along this stretch of track.
Following after these falls you walk through some of the most awesome scenery of mossy forests.

There is a lookout at the top of the Key Summit sidetrip, with some great views of Lake Marion in the distant mountains.

There is a side trip here to Conical Hill which is well worth it for the views of the lake and out to the coast. Allow 90 minutes to do this steep side trip. This area is the highest point of the track.
 |
| Harris Saddle emergency shelter. |
After walking over the top of Harris Saddle, the track diverts left cradling the ridge high above the Hollyford valley. There are fantastic views of the snow capped Darran Mountain range on the other side of the valley and there are beautiful streams of fresh water crossed over during this part of the trip. The Hollyford valley consists of both the Hollyford Rd and Hollyford River which works its way along the valley. The huts of Gunns Camp can be seen down there off the road.
You'll pass Deadmans Track along here. A vague track that could be used in an emergency if you need to get off the mountain. It leads off the main track down the hill to the valley joining up with Hollyford Road near the camp. There is cabin accommodation at the camp.
(2020 Update: Hollyford Road & Gunns Camp has been destroyed by the early 2020 Floods/Landslides so can no longer be expected to be open.)
 |
| Darran Mountain Range. |
After an hour of walking high along the range the track hairpins left to open up views of the destination for the night, Lake MacKenzie and its huts.
 |
| Lake MacKenzie. |
The track works its way in the direction we came on the other side of the range and then a number of switchbacks gets us down to the lake through some stunning moss filled forest along its lower reaches.

Even with the side trips you can do this leg of the trip in 5 hours or less. Lake MacKenzie is one of the best locations to relax at on any of the Great Walks.
The hut is right next to the water and maybe we were lucky, as this time was without the nuisance of sandflies.
The water was painfully cold even in March but a few brave soles still went for a dip.
 |
| Lake MacKenzie. |
The Lake MacKenzie site has plenty of grass and granite rocks around the lake to relax on.
There is also a side trip further along the lake which takes you to the separate tent camping grounds and to view Split Rock. This is a short 30 minute round trip. If you continue along this track to the northern end of the lake you'll find plenty of other secluded rest areas.
 |
| Split Rock track over Lake MacKenzie. |
Day 3:
Heading off the next morning you pass the Lake MacKenzie lodge (for the guided travellers) and gain some height above the Hollyford Valley passing thru "The Orchard", which looks like a fruit tree orchard, before reaching Earland Falls. There's a pit toilet along this stretch of track.
 |
| Earland Falls. |

Heading down from the track it opens out onto a boardwalk before reaching the beautful Lake Howden and its hut.
The standard high quality kitchen, toilets, running water and bunks are here.
This hut would be used for those doing the Routeburn/Caples/Greenstone track round trip.
 |
| Lake Howden. |
From Lake Howden Hut there's a steep 15 minute walk until you reach the intersection with the Key Summit track. This was the steepest/hardest part of the walk requiring a few rests along the way.
The Key Summit sidetrip is worthwhile as there are many diverse alpine flora with educational signs along it and some beautiful alpine ponds. Note there is a pit toilet early on in this side trip.
 |
| Key Summit Nature walk pond. |
# There is a separate sidetrip off Milford Rd to Lake Marion
 |
| Lake Marion. |
Returning back to the main track it takes about an one hour of a slight downhill walk through forest and following the Milford Rd before reaching "The Divide".
The Divide consists of decent sized shelter, a carpark and toilets. Put your feet up and wait for the Trackent bus to appear at either 1:30pm or 3:15pm.

Options:
If you can't do the whole Routeburn Track but just want to get a taste of it you could either walk to Routeburn Falls & Back (7 hrs return with a daypack) or from The Divide end, do a 3 hour return walk to The Summit. Well worth the effort.
A descriptive video review of the complete Routeburn track can be found here.